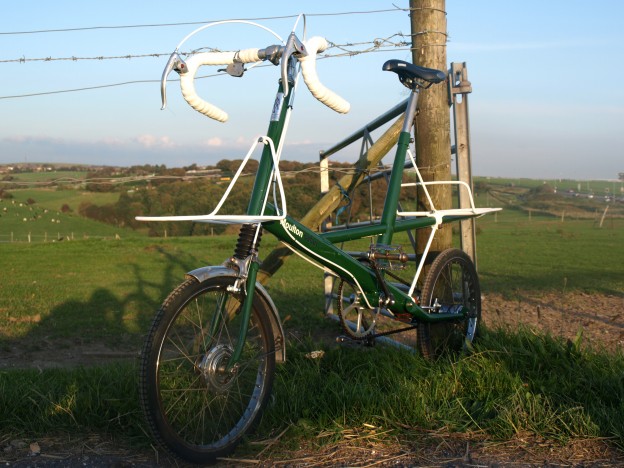
In 2005 I inherited my Dad's 1964 Moulton Safari. I didn't actually pick it up until 2006, I think, and that was when I started riding it. Unfortunately, soon after riding it became clear that there was a severe problem with the rear suspension arm - a known fault and weakness in the design that had caused the arm to tear apart at the point of stress. So, off to eBay I went to get myself a replacement rear suspension arm, and that is when my little journey of restoration began...
Well, today I took the bike out on a somewhat shorter journey, cycling up to the top of Elm Grove to meet Caroline who was horse riding today. There are still a few things to be tweaked, but essentially, the work is done.
I'm really pleased!

It has not been easy. To start with, I had to get the replacement rear suspension arm from eBay. It must have just been good timing as I found one immediately, but once I had it I then had to get reinforcement welding done to the weak spot. And of course, being a different colour, I then knew I would need to respray both the arm and the main frame. Which sounds easy initially, but that involves disassembling the entire bike, and that was tricky.
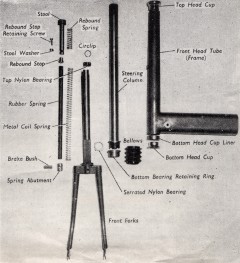
 The front forks required an exceptionally long screwdriver, although to actually realise that, I first had to understand their construction. Luckily, Dad has kept just about everything from the bikes history. He even has the Army & Navy stores receipt from 24th September 1964, when he chirpily paid £95 7s. 11d. (95 pounds, 7 shillings and 11 pence) for the Moulton Safari and various extras. Though, interestingly, Dad opted to pay in 12 monthly installments, and so the interest of £4 4s., plus additional charges, meant that the total payable was £99 12s. 5d.
Other items in the stash of documents include the original guarantee, Moulton Bicycles Limited 1964 brochure, Sturmey Archer GH6 Dynohub lighting set maintenance instructions, Sturmey Archer FW wide ratio 4-speed hub gear maintenance instructions and an interesting article from an unknown November 1962 publication. There are plenty of other items too...

All these things were tremendously useful for me, the Sturmey Archer Hub Gear diagram, above, was fantastic and helped me to completely dismantle and clean the hub inside out. It is accompanied by detailed maintenance information and technical instructions. What a great example of how things used to be, when selling something and serving the customer was altogether a more innocent process. I'd love to see everything you buy come with a break apart diagram like that. Imagine buying a microwave with a fully labelled diagram, as well laid out and clear as the Sturmey Archer manual? I think there is definitely a disconnect nowadays with what we buy and our understanding of the items and how they actually work. I like to understand how most things work.
 With the frame dismantled, I could send the parts off for respraying. Argos Cycles in Bristol took care of this, and did a mighty fine job at both the frame and the panniers- I couldn't believe it when I got the parts back. Very impressed with their quality, though it came at a price. I do have some regrets at not investigating further in to the options for colour matching against the original green though.
After that I started cleaning pretty much every part of the bicycle. Some parts were quite heavily soiled, with thick, dirty grease that needed some serious cleaning power. 'Pedro's Oranj Peelz Citrus Degreaser' was amazingly good. And for grubby hands too!
Along with some liquid Brasso and some elbow grease, every nut and bolt got its fair share of cleaning.
I had some parts to pick up - the rear suspension arm pivot bolt and the rear suspension arm rubber clamp (which required buying a pop-riveter). The Nut & Bolt shop in Hove came in extremely handy too.
Many parts with chrome are worn and I made a decision here not to undertake re-chroming. Mainly due to the cost, its a step too far on my budget. Perhaps it is something I can revisit in the future.

So, nearly there - it's not quite finished. I'm missing the bottle racks on the front, I have the front and rear lamps to attach and connect to the Dynohub and of course, we can't forget those distinctive black pannier bags (I have those too). But so far so good. It's nowhere near the standard as some of the bikes that I've seen in photographs elsewhere on the web (intimidating quality!) but I am pleased.
One thing is clear after riding the bike again today: The Moulton Bicycle is absolutely fantastic. It's a great feeling to be riding it again.
Huge thanks to Michael Woolf (without whose advice & parts, the bike wouldn't be back together!) and the Moulton Preservation society plus the excellent book, the Moulton Bicycle by Tony Hadland.
For the benefit of Moulton enthusiasts (I know you'll eventually find this article!), I've made some of the most useful documents available for download in high resolution. You can download them here, in a 44Mb zip file. Included in this file are the following:
- 1964 Moulton Bicycles product brochure
- 1964 Moulton Bicycles Limited maintenance leaflet and guarantee
- 1964 Sturmey Archer FW Wide Ratio 4-speed Hub Gear maintenance instructions
- 1964 Sturmey Archer GH6 Front Hub Lighting Set maintenance instructions
- 1964 GB Components & Spares Catalogue - Pages 7 and 8, detailing the COUREUR Plus SPORT MK.3 (on the Moulton Safari)
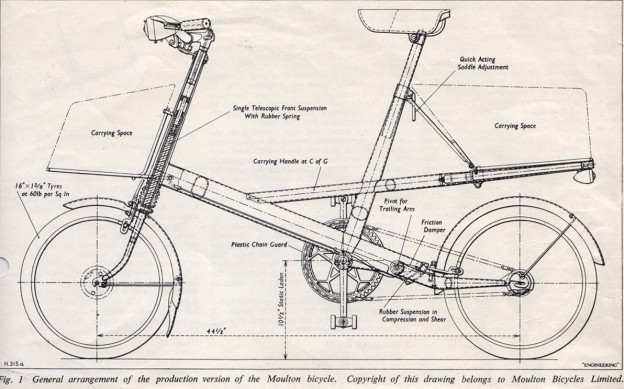
- 1962 November 9th article, "The Bicycle Revived by Fresh Design", reprinted from 'ENGINEERING'
Your Moulton lives on Dad! 44 years on!
Comments
Wow. Well done!
You must have got a great sense of satisfaction from restoring her as well.
I don’t know if you know but Marta got a red one at the same time. I’ve just shown her your blog. Like the new design of your site as well.
The diagram of the hub is great- so straightforward and so unlike the diagrams you get today I think now the manufacturers want to make things less repairable a lot of the time.
I hope you get into cycling in a big way. I really enjoy it.
Charlie Kiss
Posted 10 hours 4 minutes 47 seconds after the item.
Amazing! Well done Tom. Dad would be so proud that you did this - and did it so well. xxx
Jemima Kiss
Posted 19 hours 31 minutes 25 seconds after the item.
It gives me a warm glow to know that Dad’s things are in such good hands with you. You couldn’t have done all this without becoming a bit of a moulton fan yourself could you?
I can remember Dad cycling me mid-sixties to a convent in Finchley. I’d be on the cross bar - but looking at the model I’m not sure how a 6 yr old could sit there.
Great stuff and thanks a lot.
Justina Kiss
Posted 11 days 12 hours after the item.
You did a really good job of restoring that.
It’s strange how you mentioned the rear suspension arm weakness. I work at a welder shop, and today someone brought in a bike that looked almost exactly like yours, except the suspension arms where straight, not slightly bent like yours.
But still, even with the straight suspension arms, the reason they brought it in was to have me fix one of them.
Lincoln Miller
Posted 2 months and 24 days after the item.